A “clang-scrape-grind” noise coming from the engine bay is never a good sign; it’s even worse when it appears suddenly on a freeway off ramp. In our case, on Tyler’s 1970 MG Midget, the proximate cause was that the pulley had become very loose on the alternator’s shaft. Although we were able to resecure the pulley with a new Woodruff key and a new nut, that got us thinking:
Just how long would the Midget run without the alternator?
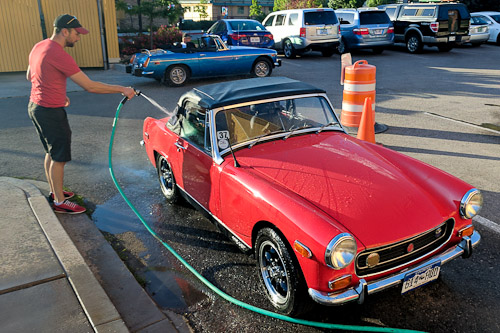
Rosie the MG Midget gets a bath from Tyler after enduring a lost alternator nut
Some Googling produced no satisfying answers, so Tyler brought his Midget over to my garage and I brought out a variety of electronics test gear. Our plan: we’d carefully isolate and measure the current consumption of various subsystems in the car, we’d combine those numbers, and then we’d compare that to the charge held in the battery. Although these measurements were specifically for the Midget, they should be somewhat similar for other non-computerized, distributor-based ignitions systems.
Experimental setup
We assumed that we’e become aware rather quickly that the alternator had died and that we’d turn off any unnecessary gear. No radio, no electric fans, and certainly no headlights. No turn signals or brake lights, either.
Also, not all alternator failures are the same. With our lost bolt, the answer to “how far could we drive” would have been “a few miles,” since without the alternator there’s no tension on the belt to turn the water pump, and without the water pump, you have an overheating MG. (You might have an overheating MG even with a working water pump, but that’s what the cockpit heater is for.) Thus, for the sake of argument, let’s say that the alternator breaks in such a way that the rest of the car remains functional but the alternator is completely electrically disconnected from the rest of the car.
With all of the accessories switched off, and no computer in the picture, the current consumption is dominated by two subsystems: the ignition and the fuel pump.
Ignition
The ignition system consists of the coil, the condenser, the ignition module, the distributor, and the spark plugs. Originally, these cars came with points instead of an electronic ignition module, but they’re functionally identical for the purposes of this investigation.
A quick overview of the ignition cycle:
- One side of the coil is always connected to +12 V
- The ignition module (or points) connects the other (low) side of the coil to ground about halfway between the time of the previous spark and the time the next spark should happen
- Current flows through the coil
- The ignition module (or points) disconnects the low side of the coil
- The coil “doesn’t like” its current being interrupted, so it “tries” to keep it going by increasing the voltage, up to several hundred volts
- The secondary coil has this rising, higher voltage coupled into it (like a transformer)
- Since the secondary coil has more windings/turns than the primary coil, the resulting voltage on the secondary is much higher than it had been on the primary (tens of thousands of volts)
- The high voltage is directed to a particular spark plug by the distributor
- The high voltage jumps across the gap in the plug, creating a spark in the cylinder
- The voltage has dissipated, so the cycle repeats
A great visual explanation of this is on YouTube.
The key to understanding the current consumption of the ignition system is thus monitoring the current into the primary on the coil during the charging phase of the spark cycle.
To start, we checked the DC resistance of the primary side of the coil and found it to be 3.9 ohms. We then measured the inductance of the primary coil at 1 kHz using an LCR meter and found it to be 9.3 mH.
Next, we measured the current into the coil and ignition module by monitoring the voltage drop across a precision 10 milliohm shunt. Since we knew the voltage and the resistance, we could apply Ohm’s law to find the current through the shunt, i.e., 100 milliamps per millivolt, and thus the current being consumed by the ignition at a particular moment in time. If we observed the shunt voltage drop on an oscilloscope, we could see how the current consumption changed over time while the engine was running at, say, 1000 RPM:
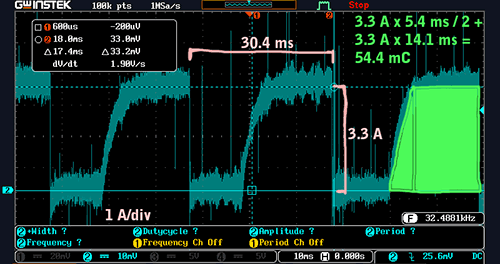
Current consumption by the MG Midget ignition system at about 1000 RPM (click to enlarge)
Notice how the current consumption does not immediately jump to its maximum level. Instead, it slowly rises in an exponential curve. This is because the primary coil is an inductor, and inductors oppose changes in current. (The rise time turns out to be roughly what we’d expect based on our earlier measurements of the primary’s inductance and series resistance.)
To compute the average current consumption of the ignition at 1000 RPM, we’ll compute the discrete integral of the current with respect to time during one spark cycle and then multiply that by the number of spark cycles per second. The result will have units of amperes and will be the average current.
To do that from the scope shot, we’ll use an approach called the “trapezoid rule” to estimate the integral over one cycle:
3.3 A * 5.4 ms / 2 + 3.3 A * 14.1 ms = 54.4 mC
We can see that each spark cycle consumes 54.4 millicoulombs of charge — most of which is wasted as heat, since the only requirement for the discharge phase of the cycle is that the current has reached its maximum value. Knowing the charge per cycle, and the cycle period, we can find the average current:
54.4 mC * 1000 / 30.4 ms = 1.8 A
Thus, the average current consumed by the ignition system at 1000 RPM is 1.8 A.
How does that change at higher engine speeds? Let’s take a look at the current consumption at 3000 RPM:
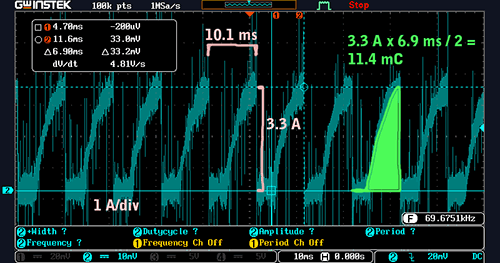
Current consumption at about 3000 RPM. Note how the charge consumed per spark period is lower than it was at 1000 RPM. (click to enlarge)
At 3000 RPM, the current in the primary coil just barely reaches a full 3.3 A before being discharged to create a spark. Let’s compute the charge per cycle:
3.3 A * 6.9 ms / 2 = 11.4 mC
…and then the average current:
11.4 mC * (1000 ms / s) / 10.1 ms = 1.2 A
It’s lower! Yes, the mean ignition current decreases as engine speed increases.
However, you might notice a problem. If the engine speed were to increase even more, there would no longer be enough time for the coil to reach its nominal maximum current. That would mean less current change during the discharge phase of the cycle, which would mean a lower voltage at the spark plug. Eventually, with a high enough engine speed, there wouldn’t be enough voltage for a spark — but that speed would likely be far above the point where there would be other mechanical problems, such as the valves floating.
A related problem occurs when the battery voltage diminishes. The maximum current in the coil is a function of the coil resistance and the system voltage, so as the system voltage decreases, so too will the current in the coil. As with the high engine speeds, there will eventually be a point where the current change during discharge is insufficient to generate a voltage that will jump the spark gap, and the engine will no longer run.
One more observation: the current consumption of the ignition system is independent of anything happening on the secondary/distributor side of the system. The spark plug gap, plug wires, fuel mixture? None of that matters when it comes to the current consumption of the system.
Fuel pump
The fuel pump on the MG does not run all of the time. Instead, it runs only when the fuel line pressure has dropped below a particular threshold. When the car is idling, it won’t be using much fuel, so the fuel pump will run relatively rarely. When the car is under hard acceleration, it will be using a lot of fuel, so the fuel pump will run very frequently.
To measure the current consumption of the fuel pump, we put the current shunt in series with its supply wire in the wiring harness in the passenger footwell. When the pump was active, it made a “bloop” noise, and since we’re not sure exactly what the fuel pumping rate was, that will be our unit of measure. Here’s a scope shot of the charge consumed by one bloop:
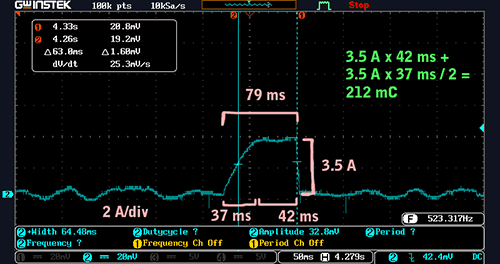
Current consumption during one ‘bloop’ of fuel pump run time (click to enlarge)
The approximate definite integral of the current consumption with respect to time was:
3.5 A * 42 ms + 3.5 A * 37 ms / 2 = 212 mC
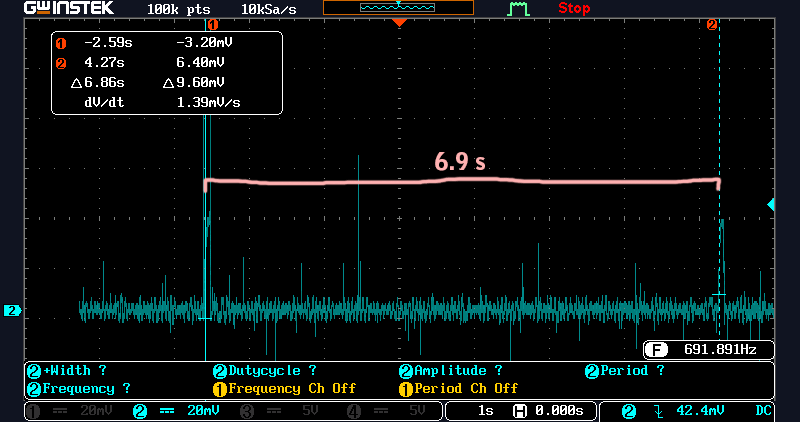
At idle, there was one bloop every 6.9 seconds:
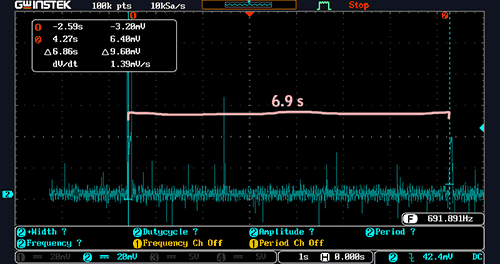
Period between fuel pump ‘bloop’ run times with engine at idle (click to enlarge)
As a result, the average current consumption of the fuel pump at idle was:
212 mC / 6.9 s = 31 mA
Unfortunately, we did not directly measure the current consumption of the fuel pump while we were zipping down the highway. Fuel consumption, and thus fuel pump current consumption, depends on the load on the engine and the efficiency of the engine at the particular rotational speed. Moreover, to use the idle values as a reference point, we’d need to know the power being produced by the engine at idle and the power required to maintain a particular speed.
After some investigation, we decided that a reasonable upper bound for traveling at highway speeds would be 10 times the fuel consumption at idle. That means the fuel pump would need to bloop ten times as often, which would make the mean current consumption:
31 mA * 10 = 310 mA
Given the scale of the fuel pump current consumption relative to the ignition, this is likely to be a sufficient estimate as long as we believe we’re within an order of magnitude of the actual number.
Other
In theory, the ignition and the fuel pump should have been the only things drawing power with the lights, electric fans, and radio off. However, when we checked the overall current consumption of the car by placing the ammeter in series with the battery, with the fuel pump and ignition disconnected and the car’s key in the “run” position, we found an additional average load of 600 mA.
At the time, we didn’t have an explanation for that. However, upon further reflection, I now believe it was an artifact of our experimental setup.
You see, we didn’t actually disconnect the alternator during these measurements. That wouldn’t matter for most things (other than keeping the voltage slightly higher and more stable than it otherwise would be), but it would matter when measuring the overall quiescent current drain of the car. The reason is that the alternator requires a non-trivial amount of current to keep its field coil energized. In our experimental premise, we stated that the alternator would be completely disconnected from the rest of the car’s electrical system, so the field coil current wouldn’t be a factor.
However, in a real-world situation, depending on the nature of the alternator failure, it would be possible for the alternator to fail to produce usable current but still be drawing current for its field coil. If you think that’s important, feel free to add it back in to the battery-life calculations below.
Combined average drain
Since a motionless running car isn’t much good, let’s assume that we’re going to drive on a highway with an engine speed of 3000 RPM. We simply sum the average ignition current for that speed and our estimated average fuel pump current to find our overall average:
1.2 A + 0.3 A = 1.5 A
Great! That equates to about 20 W, or less than a turn signal bulb.
Battery
Now that we know our average current drain, we need to figure out how long the battery can sustain that level of current without being charged by the alternator.
The battery in a 1970 MG Midget is a Group 51R lead-acid battery. Most brands in that size seem to have similar performance, so let’s use a Duralast for our calculations. The Group 51R Duralast has a specified “reserve capacity” of 75 minutes. That’s the amount of time that a fully charged battery will support a 25 A load before dropping below 10.5 V. We need amp-hours, which we can find using:
75 min * (1 hr / 60 min) * 25 A = 35.1 A-hr
Under the light loads we’re considering here, a 12 V lead-acid car battery’s voltage is “falling off a cliff” by the time it hits 10.5 V, so 35.1 A-hr really is about the most usable charge we can expect to extract.
Putting it all together
With those calculations done, we can find how long we can drive! Simply divide the amp-hour capacity of the battery by the current being drawn by the ignition and fuel pump to determine the number of hours of run time:
35.1 A-hr / 1.5 A = 23.4 hours
Wow, almost a day!
That’s assuming, of course, that you don’t have your headlights on, which is going to be tough if you want to drive that long. With the headlights on, your current consumption will increase by about 10 A, so your overall average consumption would be:
1.5 A + 10 A = 11.5 A
…and thus the amount of time you could run on battery alone with your headlights on would be:
35.1 A-hr / 11.5 A = 3 hours
Still lots of time, but a good incentive to take a direct route home.


Recent Comments